Luke W
-
Posts
5,768 -
Joined
-
Last visited
Everything posted by Luke W
-
They look great dogdude! "As good as a bought one"
-
Ditto - actions are brilliant. I have an action to resize, sharpen and save as JPG (amongst many other actions).
-
Just a reminder - it's imperative that the pup doesn't toilet in it's crate.
-
Very nice shots Ripley. Today, overcast, before the sun came out
-
You can keep each version (print sharpened, web sharpened) or you could just keep the edited copy which has not been resized or sharpened for output. If you need to recreate the web version, it's a simple matter of resizing and sharpening. If you need to recreate a print versio, same. I tend to make sure I keep at the very least: The RAW file, the ACR XMP data and if I've done a lot of work on an image, a layered PSD file prior to resizing and output sharpening. Quite often, I've also got various web sized and sharpened images lying around too...plus the odd print sized and sharpened image too...storage is cheap.
-
This is going to get tricky... Your camera tries to expose all images so that the pictures turns our roughly 'middle grey'...this means if you photograph white snow - it comes out grey. If you photograph a black fur, it comes out grey. On average, the camera tries to get everything grey. This is a slight simplification but explains what's happenig with your bird shots. The camera is try to make the image middle grey. So the birds are underexposed. In this case, to get detail in the bird, you want to expose so the sky is brighter and you get more detail in the birds. Typically this means using exposure compensation (+1, +2), while checking the histogram to make sure the sky doens't end up pure white.
-
Just set your white balance to cloudy. BTW - If by warmth, you mean color temp - nice warm, orange tones...this is predominantly controlled by white balance (or in post processing). Technically, midday sun is cool (blue), sunrise and sunset are warm (orange). In shade also tends to be cool (blue) as well. In the old days, you would have popped a warming filter on the lens (an orange filter) to make the tones nice and warm - nowadays you just change the white balance. so if I'd done that yesterday would my photos have come out looking warmer? It never occurred to me. I hadn't got as far as thinking about white balance. I am obviously not using a thumbnails worth of what this camera can actually do gee I look forward to the day I can really bring out the best in it. One of the advantages of shooting in RAW is that you can change your white balance after the fact. Even shooting JPGs though, it's not that hard to warm up a shot in Photoshop. As a matter of fact, Photoshop CS3 even has a built-in warming filter. In earlier versions, it's still pretty easy. PS - we really have to make sure we are talking about the same thing. Here's one shot with 2 different white balances. The first shot is cool (bluish), the second is warm (orangish). The only difference is the white balance setting. Is this what you mean by 'warmer'?
-
Just avoid the sky I'm going to head down the beach today - I'll try to get some nice portraits.
-
Just set your white balance to cloudy. BTW - If by warmth, you mean color temp - nice warm, orange tones...this is predominantly controlled by white balance (or in post processing). Technically, midday sun is cool (blue), sunrise and sunset are warm (orange). In shade also tends to be cool (blue) as well. In the old days, you would have popped a warming filter on the lens (an orange filter) to make the tones nice and warm - nowadays you just change the white balance.
-
I'm working today but I hope you do so I can learn something. Actually, overcast days are ideal!!!! Much better than harsh midday sun. Overcast sky is the world largest softbox. You get lovely soft even lighting. Perfect for no shadow portraits. Find a nice background (green leafy is good, even a brick wall can work well) - and start taking some head shots!
-
ok - maybe I should buy a new black dog one and see how it goes - I threw out the one where the stitching was coming loose. I do have a maxi black dog one with a liner but it's a bit more cumbersome than my old regulkar size one. I did find these: http://ldsleather.com/Merchant2/merchant.m...her_accessories http://www.smartpakcanine.com/ProductClass...veCategory=true
-
imo - 1/1000 won't be slow enough to blur the background - unless your shooting F1 cars.
-
thanks Luke, I did understand that part. can you please explain it to my whippets with the 3/4 I just started shooting when I saw her start to move. they are so quick, and you dont know where they'll go, it's like trying to photograph a blow fly! If I didn't have so much other stuff to train - I'd like to teach my dog to run across my field of view... hmmm.... Maybe put my dog in a stay....put a treat about 20m away...move into position, release him to get his treat... dog--------------------------------------------------------------------------------------treat ---------------------------------------camera-------------------------------------------------
-
I'd need big baggy pockets for ease of access Absolutely ! That's why I have 3 paris of "agility shorts" with big pockets with zippers so stuff doesn't fly around when I run (yes it did happen with my "non-agility shorts" ) I have a bag where most of my treats are and I just replenish my pockets from time to time. I find this the best transition between training and trailing. :D Do you have long arms? I imagine with baggy pockets they'd also be deep pockets and I'd be struggling to reach into them all the time. A pouch sits so much higher. ETA: I've got short legs and short arms, pockets end up around my knees! (only slight exageration).
-
Vickie - I don't think you have much to worry about with your lens - shoot at f/8 as much as you like. You get very unique shots, somehow you manage to get the dogs to stand out without blurring the background a lot. It's very impressive. Rugerfly - tsk, tsk, you should always shoot at the highest possible resolution Krislin - keep at it - panning is not easy! You might have to take hundreds of shoots to get a couple of good ones. Yep, they need to be side on. With the 3/4 shot, it's not possible to get that type of panning shot sharp. With panning, the dog has to be travelling across the frame.
-
I'd need big baggy pockets for ease of access
-
Lots of ways. - Duplicate the layer, sharpen it, then use a layer mask to mask the background. - Sharpen it, then use the hisory brush to 'unsharpen' the background. My recommendation would be to learn to use layers and layer masks.
-
rugerfly...with dogs running toeward you, you need to use the 'tracking focus'...on a Canon it's called AI Servo. The background in your shot is blurred because it's a wide aperture. You camera selected a wide aperture so you ended up with a small depth of field. There's no EXIF with the shot (did you use "Save For web" ?) so I can't tell what aperture you used. Note... Do you sharpen your shots after resizing. You really should. This shot could be little sharper. I hope you don't mind: This was a quick sharpen. I could have got better results with a little more care.
-
BTW - The shots posted by Ripley were shot at 1/15s - they moving more slowly than a whippet running flat out .... Polomum I read heaps. Been shooting on a dSLR for around...hmmmm...since 2004. I started with a film SLR and scanning negs in 2000. Editing - Photoshop. CS3 is fantastic but can be daunting to learn. Kelby is really good. So is Bruce Fraser.
-
Hi Luke, a question. I find that at full 300 zoom, anything bigger than F8 & the subject loses sharpness...I think b/c of the shake at full zoom. Is this what you mean above? I am going to get a monopod, I noticed you had one at the Nationals. Will this help with the above problem? Many lenses simply don't perform well wide open at the extremes of their zoom range. You need to stop down 1 or 2 stops to get decent sharpness. It's just a problem with the quality of the lens. Not camera shake or anything. A monopod won't help. It often depends on the particular lens (and often on the particular COPY of the lens). Some lens are OK wide open, others not so good. Lenses have a 'sweet spot', an aperture where they perform best. For most lenses, this is one of two stops from wide open. Most lenses are at their worst wide open. They also tend to perform best in the middle zoom ranges. So your 70-300 is probably at it's best at around 200mm and at f/8. My 70-200 f/2.8 is probably at it's best around 130mm and f/4. To get telephoto lenses that perform really well wide open, you've usually got to start spending big biccies.
-
I've used the Black Dog treat bags (lasted about 3 months before it started to come apart at the seams), and the one from here: http://www.airdogs.com.au/agility/product....171&cat=255 (hinge broke after 1 month)... So...Any suggestions for a better treat bag. I think what I'm after is one that's leather with a nylon insert AND a leather clip together belt.... Doesn't have to be a hinged opening, a zip or velcro would do fine. Any suggestions?
-
Do you want a blurred background because of DOF or a blurred background because of motion blur? If you want it because of DOF, you want to shoot wide open (problem f/5.6 at 300mm). If you want to because of motion blur (ie. panning), you will have to experiment with shutter speed. You're looking for a balance between a somewhat sharp dog and a blurred background. You are also going to have to fire off a lot of shots to get the dog in the optimum position (minimal horizontal movement, minimal leg movement, minimal head movement, but still with lots of speed in the verticle plane.) For panning and a whippet running flat out, I'd be starting with a shutter speed around 1/125 and adjust from there. This is a greyhound running flatout at 1/30, so obvisouly, your shutter speed is going to have to be faster than this (unless you want this sort of efffect).
-
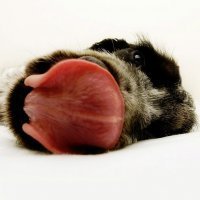
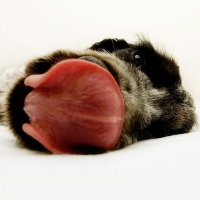
My breeder mentioned Barkly lids might droop and go a little red during teething. They did. Not as much as this though. Good luck at the vet....Poor puppy.
-
If you like the RAW converter in Elements 5 - what till you see the RAW converter in CS4... It allows you to make localised (via masks) adjustment to exposure, brightness, contrast, saturation, tint, clarity, sharpeness as well as local cloning and healing, and graduated filters. All from within the RAW converter.
-
Removing background can often be the most difficult editing tasks there is. If you've got fur or hair, or smoke or fire, blurred edges or varying DOF...it can be very difficult. Also, sometimes, some photos just aint worth editing. Far better to get a decent background, a good exposure, good focus, good light, etc to begin with. I think youi'll find that most of the better photographers here, start with a good shot, then use photoshop to make it better. Photoshop is a great, great program, but it does take practice. Have you read any books on photoshop? For what it's worth, most of my photo editing involves the following: Cropping. White balance adjustment. Exposure adjustment. Set white point and black point. A curves adjustment layer for overall contrast adjustment. Multiple curves adjustment layers with masks for local adjustments (brightening eyes, darkening backgrounds, making skies more dramatic, etc). Localised sharpening (making eyes sharper, inceasing edge sharpness). Resizing for web. Sharpening for web.